Written by Ashley Andersen, MIM Intern
Back in the good old days, we didn’t have much to worry about when it came to filtering, because there was no way to use search engines on your Sega Genesis or Nintendo 64. Now, there’s sadly a lot of pornographic content that you and your children can be exposed to on these gaming consoles.
Pornhub recently tweeted their full support of both PS4 and XBOX One because they have web browsers, allowing users to access pornography through the Internet.
Luckily, there are ways to prevent yourself and your kids from downloading inappropriate games off of the Xbox, Wii or PlayStation. This will stop anyone from looking up pornography by filtering those consoles to create a safer environment.
Wii/Wii U.
Let’s start with your Wii and Wii U. The Wii is a really popular console amongst families, especially with smaller children. Unfortunately, it was the first console to allow pornography to be viewed via their web browser. Here’s how you can fix that:
Wii
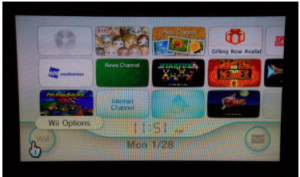
Start by turning on your Wii and on your Wii Menu and select the “Wii” button. (Scroll down this tutorial if you want Wii U).
Next, select the Wii Settings. You will then be directed to a page(s) that looks like this:
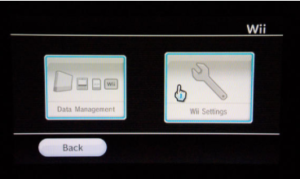
Click the right arrow on your “Wii Systems Settings 1” page to get to “Wii System Settings 2” page, where the parental controls are. Click on “Parental Controls.”
Click “Ok” three times to begin setup. It will ask you for a PIN number, so think of a few numbers that your kids can’t hack and then input those numbers. It’s advised to not to make your PIN simple like 1234 or 4321, etc., Think of numbers that are random, like 4893, or 5820, it can be anything.
It will then ask you to input your PIN again, so do as it asks and click “Ok.” Then it will ask you to select a security question, after you have finished that part, select “Ok” again. Then, select “Game Settings and PIN” then “The Highest Game Rating.”
Use the blue arrow to scroll through the ESRB ratings. That page will look like this:
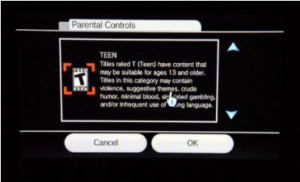
After you select the rating, and select “OK” select “Confirm.”
Then select “Other Settings” and “OK.”
For each setting, select “Do not restrict” or “Restrict” and “Next” to proceed. (Some features will not appear until the Wii console is connected to the Internet). Once all the selections are made, select “Confirm.”

Select “Settings Complete” to save the changes and you’re done with your Wii.
Wii U
Setting up the Wii U is a little simpler than the original Wii. Start by turning on your Wii U and select the “Parental Controls” on the menu.

After you’ve read the information on the screen, either tap “Next” or press the A button to continue.
Tap “Next” or press the A button again and it then will ask you to create a four-digit PIN. As stated above, please create a PIN that cannot be easily figured out by your child. After you create your PIN, tap “OK.”

Now, it will ask you to select a security question. Use your on-screen keyboard to type in your answer to that selected security question and when you are done, tap “OK.” You can also tap “Start Over” to redo your PIN and security question. Tap “OK” again.

Now, you can register your e-mail address, just in case you ever forget your PIN, to reset it.
When done, tap “Next” or press the A button. If you don’t want to register your e-mail, tap “No E-mail Address” or press the X button then tap “OK.”
Using the on-screen keyboard, enter in your e-mail address and then tap “OK.” You will have to enter your e-mail in one more time to confirm, and then tap “OK” one more time.
Finally, if you check your email, you will notice a confirmation e-mail from your Wii U. Now, you can adjust your settings as needed.
Xbox 360/Xbox One.
With Xbox, you not only can control the ratings and content of games and videos, but you can control how long you or your family stays on the Xbox. You can also decide if you want to create an Xbox Live membership and/or connect to Xbox Live.
Xbox 360
As you do with any console, turn on your Xbox and click on your Avatar (the little person-type character on the screen sleeping). See the picture below.

If you don’t have an account but your child does, it would be good for you to create your own account where you can manage the privacy settings. Once you click on an Avatar, it will spin around happily and you will then be directed to your menu screen.
![]()
First you’ll have to set up your password/PIN, just like on the Wii, to have full control of the Xbox 360. So, go all the way to the right of your menu where the “Settings” are and click on “Family.” Select “On” to turn on console safety and enter a 4-button pass code using your controller. Then select “Save and Exit.” Once you do this, you can control all the parental controls easily. Press the B button to exit to the Xbox menu and click on “Privacy ” which is in the same area as “Family.”

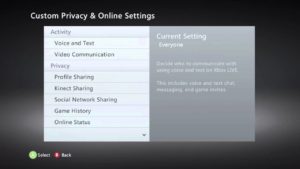
Select “Change Settings,” and then select “Customize.” A screen like this will appear:

Now you can change the settings to whatever you want. Don’t forget to select “Save and Exit” to save your changes. This is the screen that appears when you “Customize”:
Now, if you want to change a specific account that your child uses, you can go back to the “Family” section in “Settings” and select the account you want to manage. Go to “Online Safety” and select “Change Settings,” once again. Change the settings to anything you’d like and select “Save and Exit.”

*For more information on how to set up your family timer and changing the pass code, please visit Xbox support.
Xbox One
On the Xbox One, you have full control over what your child can do and what they are doing. You can customize profiles individually, for example, if you have a child that is 10 years old, you can set the privacy settings where they can only play rated E (for everyone) games and only watch kid’s shows. If you have a 14 year old, you can change the settings for them to not playing anything rated over T (teens) and they can’t watch anything rated R. That’s the beauty of the new console.
First, sign in to your console and on your controller, and press the “Menu” button. Select “Settings” and scroll to the right to “Family,” then select the profile you want to modify.
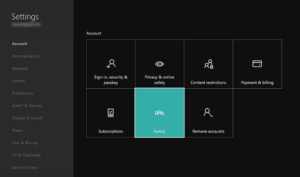
After selecting that profile, you’ll be shown the current settings and restrictions. Here, you can select any default setting or you can customize your own settings.
To customize a profile, select “Use, but customize.” You will then see all the different customization options for each setting. When done, press B on your controller to return to the previous screen.

To customize and filter the web for your child, after you select “Settings,” and select the profile, go to “Content Restrictions,” and select “Web filtering.” You can then select and enable the level of filtering. When done, press B on your controller to return to previous screen.

For more information and ways to filter, please go to Xbox One Support
PlayStation 3/PlayStation 4.
With the parental controls, both PS3 and PS4 are able to restrict the game and video content, as well as using the Internet, so even when you’re not home, your child is protected 24/7.
PlayStation 3
The first thing you need to do, as with the other consoles, is to set a password/PIN. In order to do that, you need to first, turn on the console and second, select “Settings.”
In “Settings,” scroll down to enter the “Security Settings” menu.

Once there you can scroll down and select “Parental Control.”
Here, you can enter your password (Note: The password is set to [0000] by default at the time of purchasing your PS3, so for now, just use the default password if you have no password).

With PlayStation, their ratings are leveled by numbers, so for example, anything above level 5 is T-rated games, and obviously anything below 5 is E (everyone) or E 10 and so forth (please refer to the ESRB ratings at the end of this tutorial).

Now, to change your password, so only you can access it, go back into the “Security Settings” menu, scroll up and select “Change Password.” Enter the system’s password (0000) and then enter the new password when asked.

Enter the new password again to confirm it then select “Yes,” to confirm the change. Also, when you want to play an M (mature) game, you will have to enter your password.
PlayStation 4
For PS4, you will need a Master Account. If you do not have a Master Account, please clink on this link. For those who do have a Master Account, please continue to follow the tutorial.
You need two different pass-codes. A Master Account passcode, which prevents others from accessing your account where you change the parental controls, and a Parental Control passcode, which must be entered before changing anything (Note: just like the PS3, the PS4 has a default code of: 0000).
The next thing you need to have in order to change the parental controls is a “Sub Account.” If you do not have a Sub account set up, please refer to this link.
If you have a Master Account and a Sub Account, you are now ready to change your settings. In this tutorial, you will only be showed how to restrict games and applications that have age ratings. Once you know how to do that, you can go back and change everything just the same.
To start, make sure you are logged into the Sub Account you would like to restrict. From the PS4’s home screen, press up on the d-pad to get to the function area.

Here, you can go to “Settings” and then “Parental Controls.”
From there, go to “Restrict Use of PS4 Features” and then to “Application” and choose the level you would like to set.

The Sub Account will be restricted now and the user will only see a padlock icon in place of the normal artwork for the game or app.
Note: “Allow” means there are no restrictions. Just like the PS3, the PS4 is based upon numbers/levels. 11 is the least restrictive and 1 is the most restrictive. (Please refer to the ESRB Ratings at the end of this tutorial).
When you want to change Blu-Ray movies, DVD movies, Internet Browser, text, video, voice chat messages, videos, pictures, the PlayStation store and spending limits, simply go back to “Restrict Use of PS4 Features” and to that specific category and change the restriction levels as shown previously with games and apps.
For more information about restrictions and filtering, please follow this link: PS4
Congratulations, you have now successfully filtered and restricted the use of your consoles so you and your children can feel safe in your own home, away from any obscenities.

*ESRB Ratings For PS3 & PS4:
–Level 2: (Early Childhood). Intended for young children.
–Level 3: (Everyone). Content is generally suitable for all ages. May contain minimal cartoon, fantasy or mild violence and/or infrequent use of mild language.
–Level 4: (Everyone 10+).
–Level 5: (Teen).
–Level 9 and up: (Mature)
An updated NCOSE blog on the parental controls for Xbox 360 can be found here: How to Use Parental Controls for the Xbox 360

